How to Import data into the IceHrm?
Reading Time:
Reading Time:

You can import data into the IceHrm using CSV files. By default, we support importing basic employee details, payroll data, and attendance data. This feature should be used only during the initial setup.
1. You can download a sample data file here. Also, we have uploaded a sample data file in our user guide.
2. The file has following columns which match with default employee data file definition
· employee_id = The id of the employee (this id should be unique, if the employee with the same id exists in the system then employee details will be replaced)
· first_name, middle_name, last_name = Employee names
· address1,address2,home_phone,mobile_phone,work_email = Employee contact details
· gender = Male or Female
· marital_status = Married, Single, Divorced, Widowed, Other
· birthday = MM/DD/YY format
· Nationality/nationality = Any nationality defined in System -> Manage Meta Data -> Nationality
· Ethnicity/ethnicity = Any ethnicity defined under System -> Manage Meta Data -> Ethnicity
· EmergencyContact/name = Emergency contact name
· EmergencyContact/relationship = Emergency contact relationship
· EmergencyContact/home_phone = Emergency contact phone
· ssn_num = Social security number or ID number
· job_title = Job Title (this should be predefined in Admin -> Job Details Setup -> Job Titles)
· employment_status = Employment Status (should be predefined in Admin -> Job Details Setup -> Employment Status)
· joined_date = Joined date in MM/DD/YY format
· department = Company Structure this employee is attached to (predefined in Admin -> Company Structure)
How to import basic employee data into IceHrm?
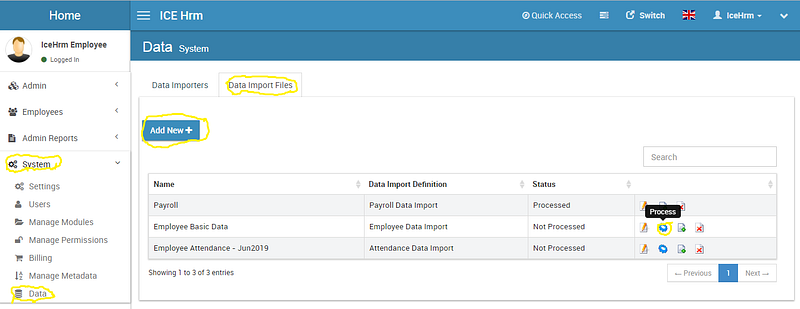
1. Login as Admin and Navigate to System
2. Under System, Click on to Data
3. Under Data, you can find two tabs Data Importers and Data Import Files
4. Under Data Import Files and click on to Add New in order to add a new data file to the system (data file should be according to the previously explained format)
5. Use a descriptive name
6. Select Employee Data Import option as the Data Import Definitions
7. Choose the file and Save
8. Once data imported, click on the Process Icon
We have already defined three types of data importers for Employee Basic Data, Attendance Data and for Payroll. You can customize a Data Importer based on your requirements.
Assume that you want to add you supervisors for your employee list, you can do it as below;
1. Login as Admin and Navigate to System
2. Under System, Click on to Data
3. Under Data, you can find two tabs Data Importers and Data Import Files
4. Go to Data Importers and click on to Add New in order to add a new data importer
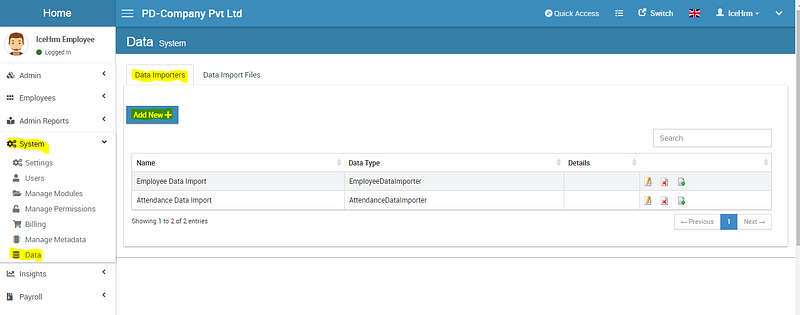
5. Name the Data Importer as “Supervisor Importer” and Data Type should be “EmployeeDataImporter”
6. Each importer should have one ID column. Click on the Add option to create columns for each importer

7. According to our example, we need two columns for employees and supervisors. For employees, the id column should be employee_id. Here is how you can add this unique id column.
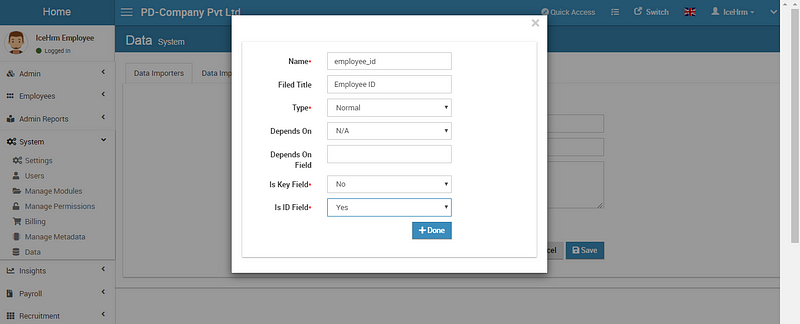
For supervisors, the id column should be supervisor_id. Here is how you can add this unique id column.
This is based on lots of customer inquiries. Let’s create an example job title and see how to assign employees to the job title while importing data to the system.
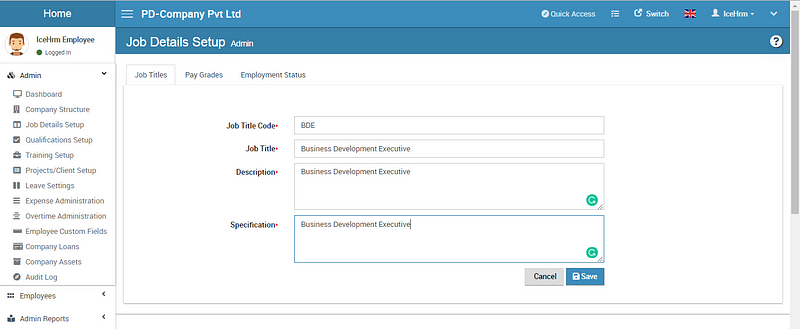
To create a job title;
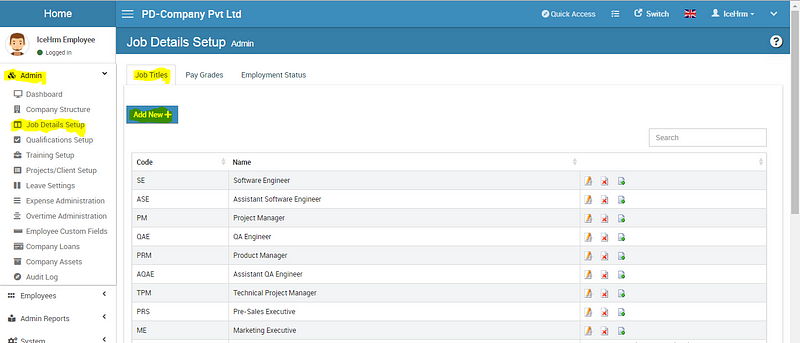
4. Fill the necessary fields as per the requirements of the job title
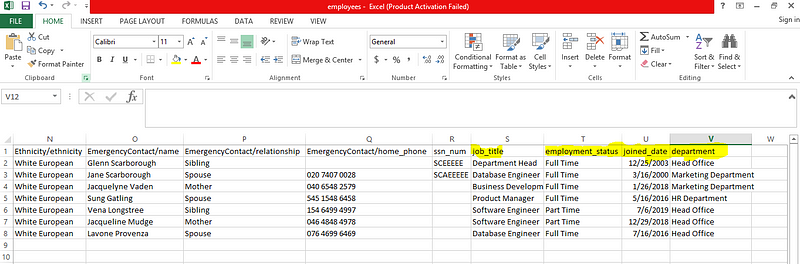
Let’s see how to specify the job title while importing data. The easiest way is you can download the sample data file and edit the data. You can enter the Job title in the CSV file you create, also you can specify other job-related details as the employment status, joined date and department as below;
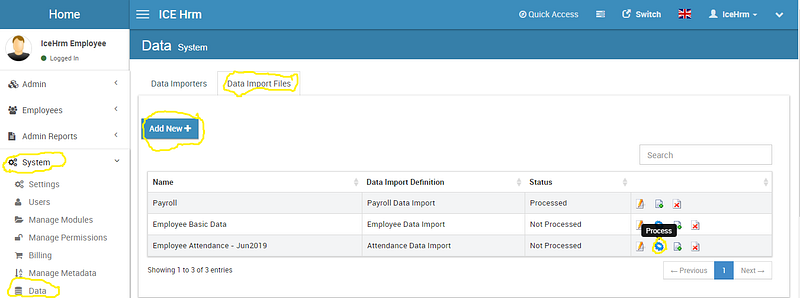
To import the data;
1. Login as Admin and Navigate to System
2. Under System, Click on to Data
3. Under Data, you can find two tabs Data Importers and Data Import Files
4. Under Data Import Files and click on to Add New in order to add a new data file to the system (data file should be according to the previously explained format)
5. Use a descriptive name
6. Select Employee Data Import option as the Data Import Definitions
7. Choose the file and Save
8. Once data imported, click on the Process Icon
You can download the below sample data file for your reference. https://drive.google.com/drive/u/0/my-drive
You will only need this process if you are uploading attendance data from your attendance recording devices instead of allowing employees to punch in/out using IceHrm. Same as the employee data import process, you need to prepare the data into a specific format.
1. You can download the sample attendance file from here
2. Then add your attendance data according to the same format
3. Log into the admin account and Goto System -> Data -> Data Import Files tab
4. Click on Add New to data import
5. Use a descriptive name
6. Select Attendance Data Import option as the Data Import Definitions
7. Choose the file and Save
8. Once data imported, click on the Process Icon
IceHrm team has already created a few sample payrolls which you can import and use to generate or study the payroll creation process. You can find the samples on the user guide as well.
Below are the sample payrolls.
Sample Payroll Setup
Sri Lanka Payroll Setup
Ghana Payroll Setup
To import a pre-defined payroll system;
1. Log in to the Admin account
2. Go to system and select Data module
3. Under the Data module, click on to Data Import Files tab
4. Click on Add New to data import
5. Use a descriptive name
6. Select Payroll Data Import option as the Data Import Definitions
7. Choose the file and Save
8. Once you are done click on to “Process” button