IceHrmProfileIceHrm team write blogs and tutorials about using IceHrm efficiently to manage HR activities of your organization.
Create Your IceHrm installtion here: https://icehrm.com
User Permissions
Reading Time:
When you want to give privilege to a particular user, you can do this by changing the User Level of the user or using the IceHrm User Role option.
With updated user permission module IceHrm now supports following user levels:
Admin
Manager
Employee
Restricted Admin
Restricted Manager
Restricted Employee
Admin user level has all the access to the IceHrm account, while the manager has limited access to administration functionalities.
For example, under the leave module, a manager can see their subordinates leave days, can approve leaves, grant leaves. But as an admin you can see leave requests from all the employees and act on these requests.
An employee has all the to use the platform as an employee.
Let’s take an example scenario to understand how to grant admin access to one of your employees or managers:
You can log into the admin account
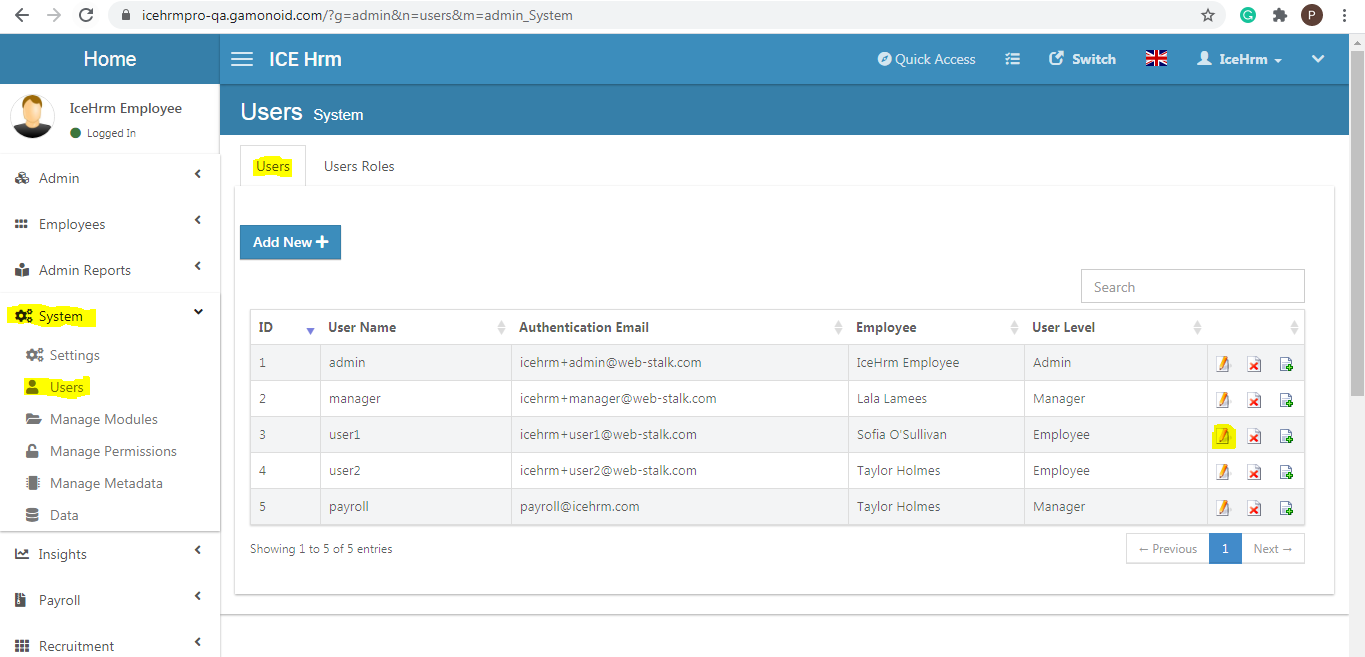
Go to the System section and click on the Users
Then click on the User tab in order to make changes
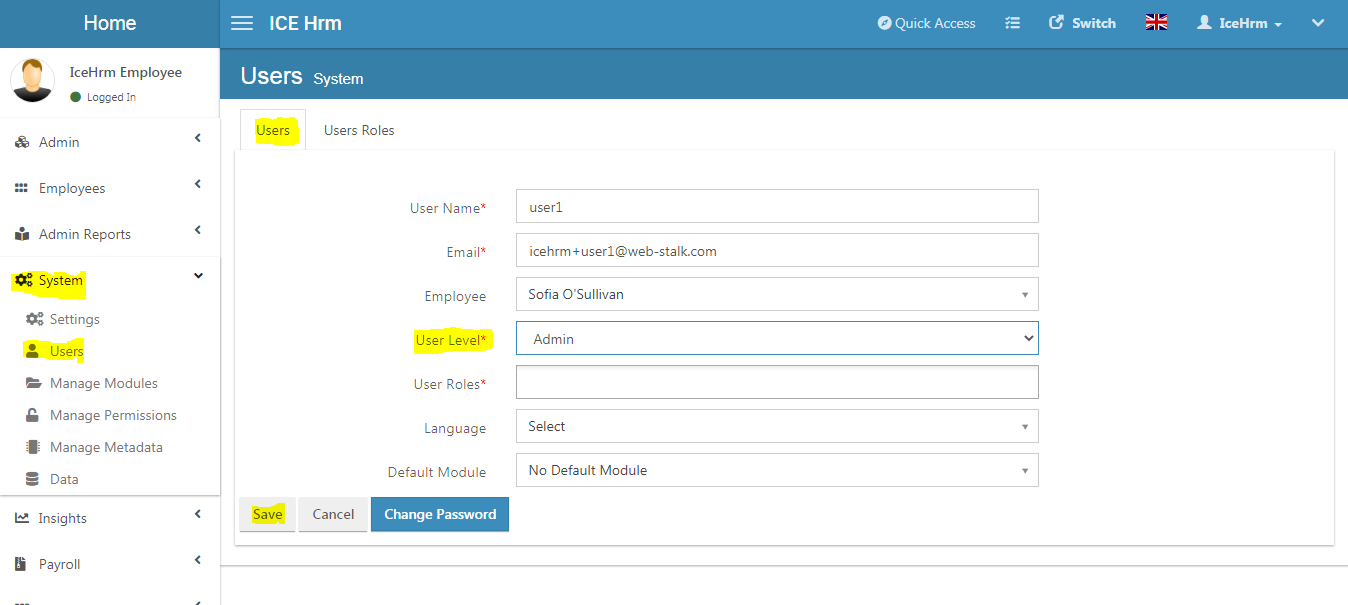
You can select the employee you want to make changes and click on the edit button
Now you can change the User Level of the employee to Admin.
Now you can select the user level as Admin and click on the Save button. So the particular user will have all the access granted for an admin.
Use of Restricted User levels
Restricted User levels are the same as the other user levels but with restricted access. If you have not granted specific permission to a restricted user using a user role, they won't have any access rights.
Let's take an example, imagine there is an external recruitment manager who will become a temporary employee of your company only to manage the recruitment related activities.
In this case, you can add a Restricted Manager and grant only the required permissions.
This will involve providing granular entity-level permissions to a user role. There are 4 Different types of entity-level permissions:
List - User can load the list of entities
Get - User can view an individual entity
Add/Edit - User can add data or edit data
Delete - User can delete data
Adding Restricted Recruitment Manager
Log in to the admin account
Go to the System section and click on the Users
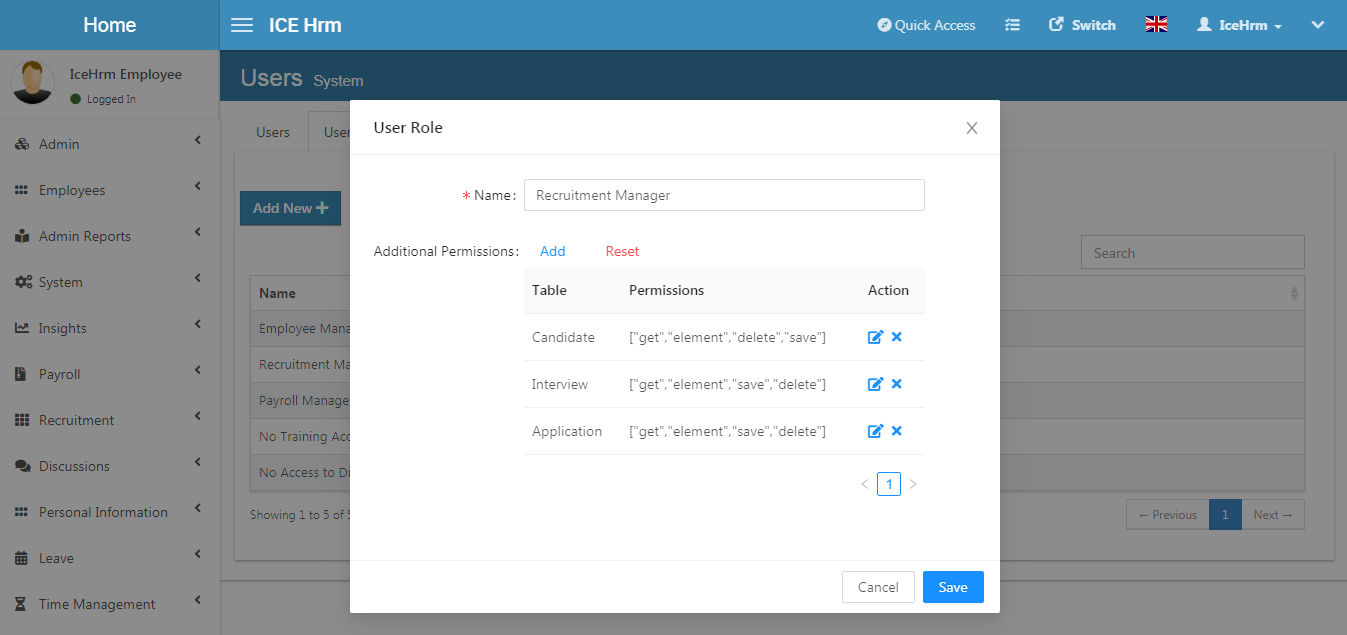
Then click on the User role tab and then click on the Add New option in order to create a New User role
Then you can give a specific name to the User role - For this one, you can use Recruitment Manager
Then click on Add to select the permission level
Select the Table and then the Permission level you need to grant and then click on Save ( According to the above example, this user only needs to view recruitment data and make adjustments, so we select List, Get, Add/Edit and Delete options for candidate, interview and application entities )
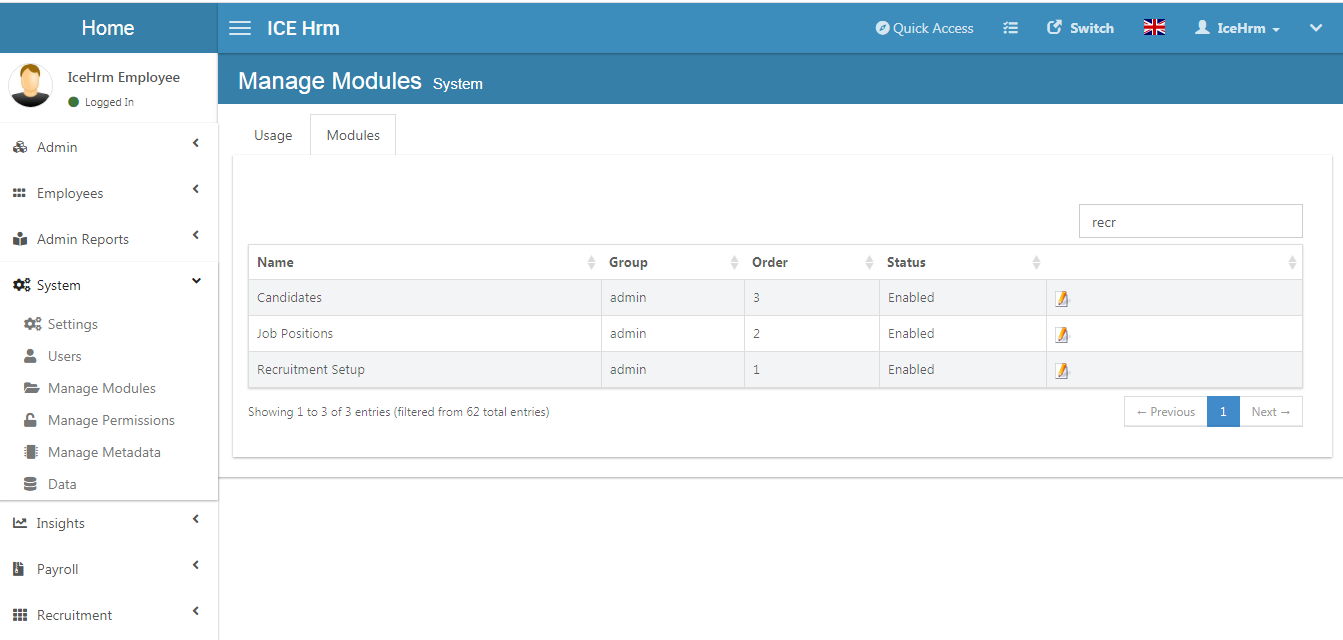
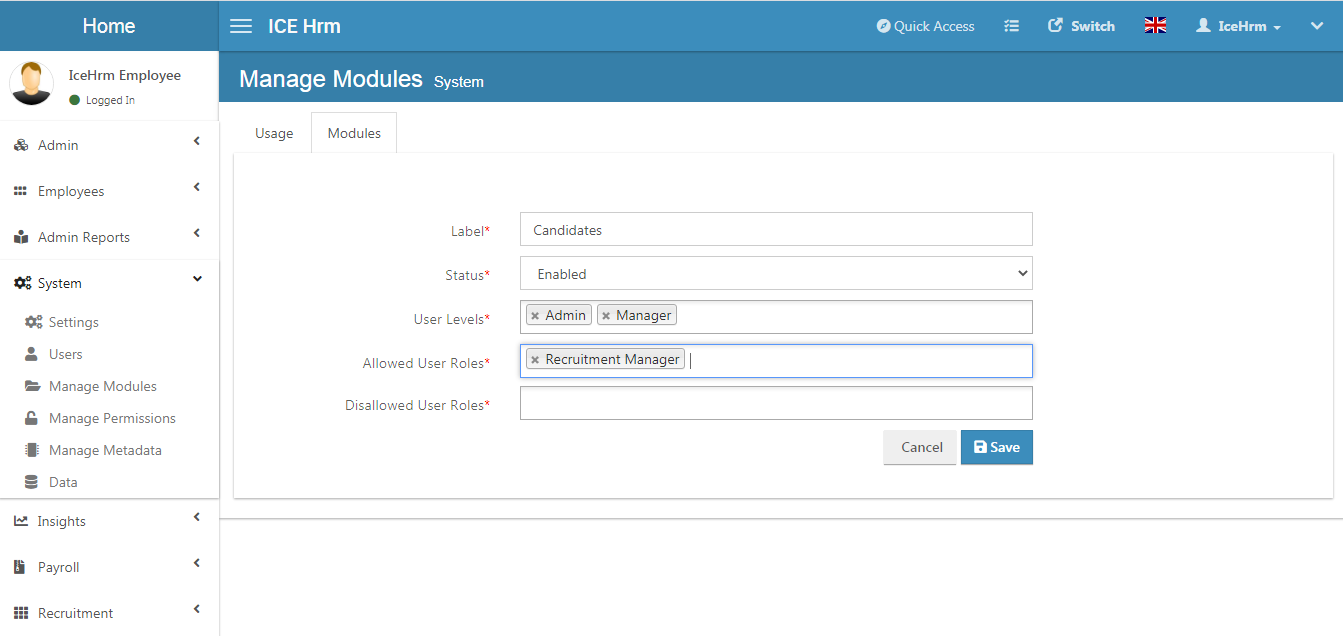
Now go to the Manage modules section under the System in order to assign the particular module to the new user role
Then click on the Modules tab and search for the particular module
Click on the edit button to make changes
Select all the modules required for the recruitment process and add the created User Role to all of these modules and save changes
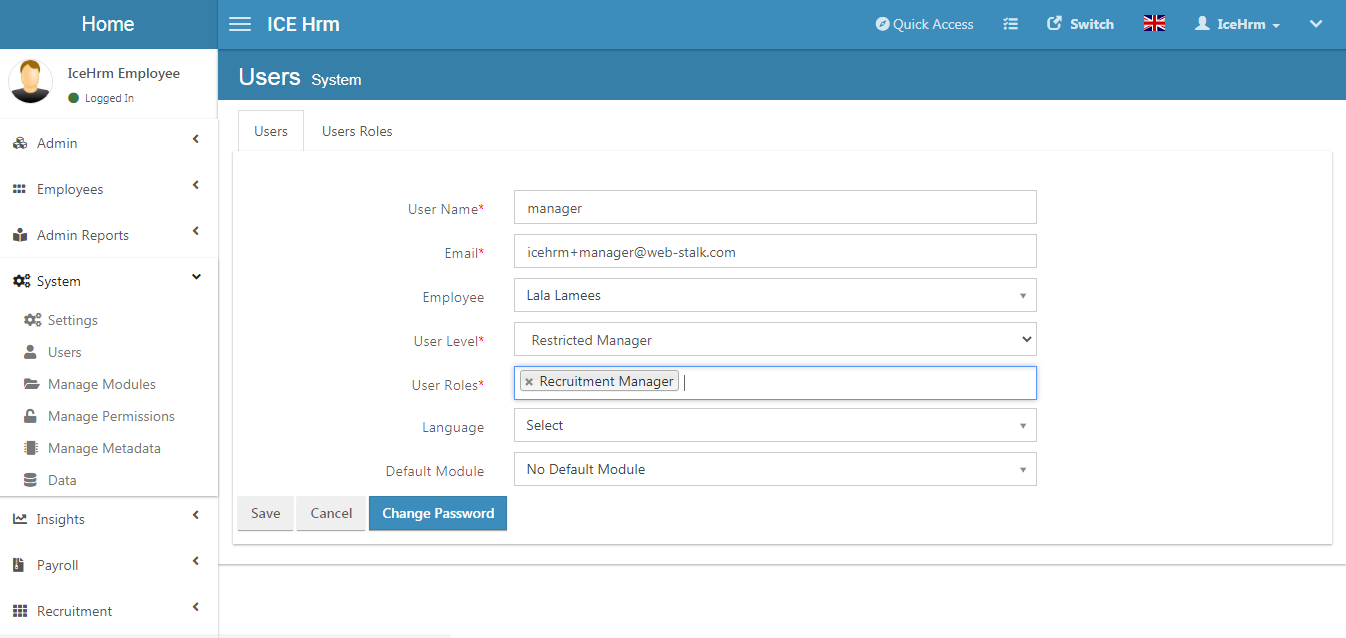
Once you created the User role and then Assign the module now you can go back to the User section and click on the User tab in order to assign this to the manager
Select the user you want to make changes and click on the edit button
Now change the User Level of the employee into the Restricted Manager user level
Then add Recruitment Manager user role which you have already created
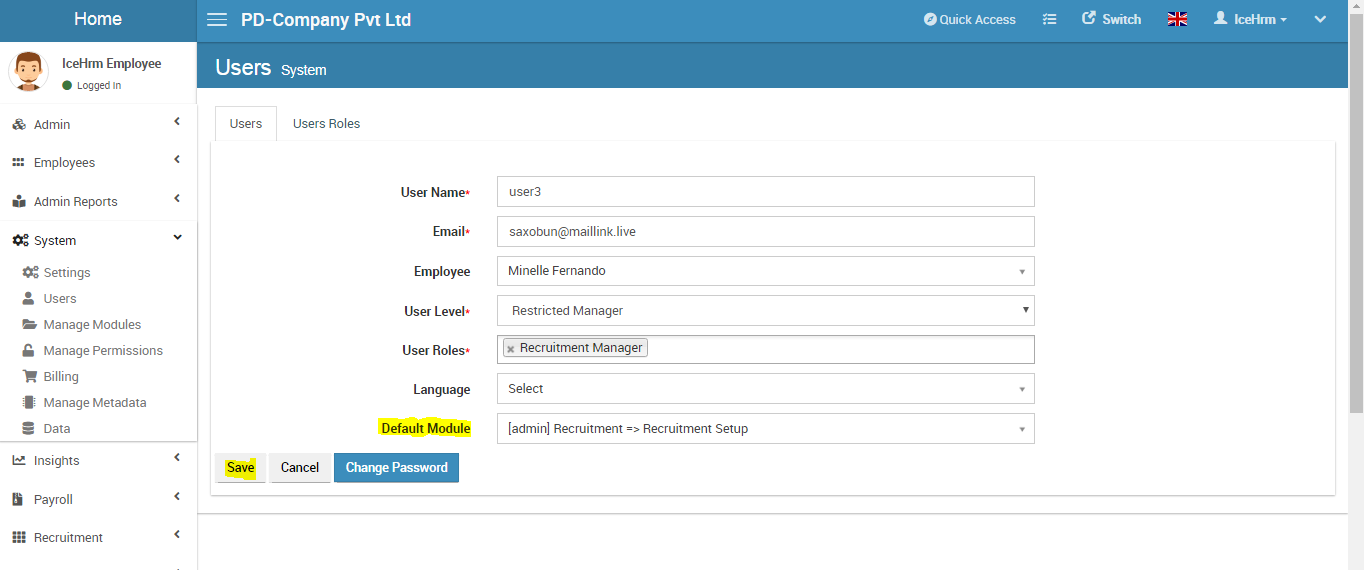
You won't be able to save the changes unless you have assigned a Default Module. This default module is important because that's what the users can see in their dashboard as they log in
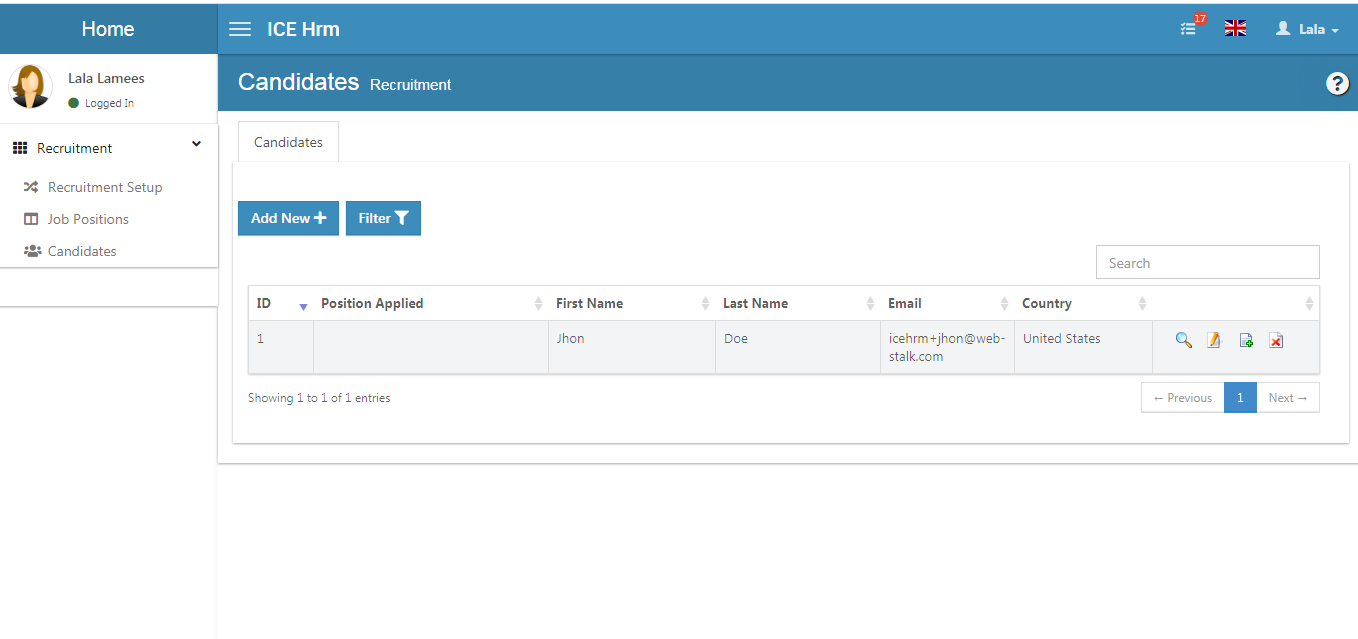
Once you save the changes login to the Recruitment Manager's account, it will look like the below. And the recruitment manager will only have access to recruitment modules
Restricted Employees
Restricted Employee is also similar to the employee level but with restricted access. For example, imagine you need to give access to one of your sales parsons only to mark attendance.
To do this;
Login to the admin account
Go to the System section and click on the Users
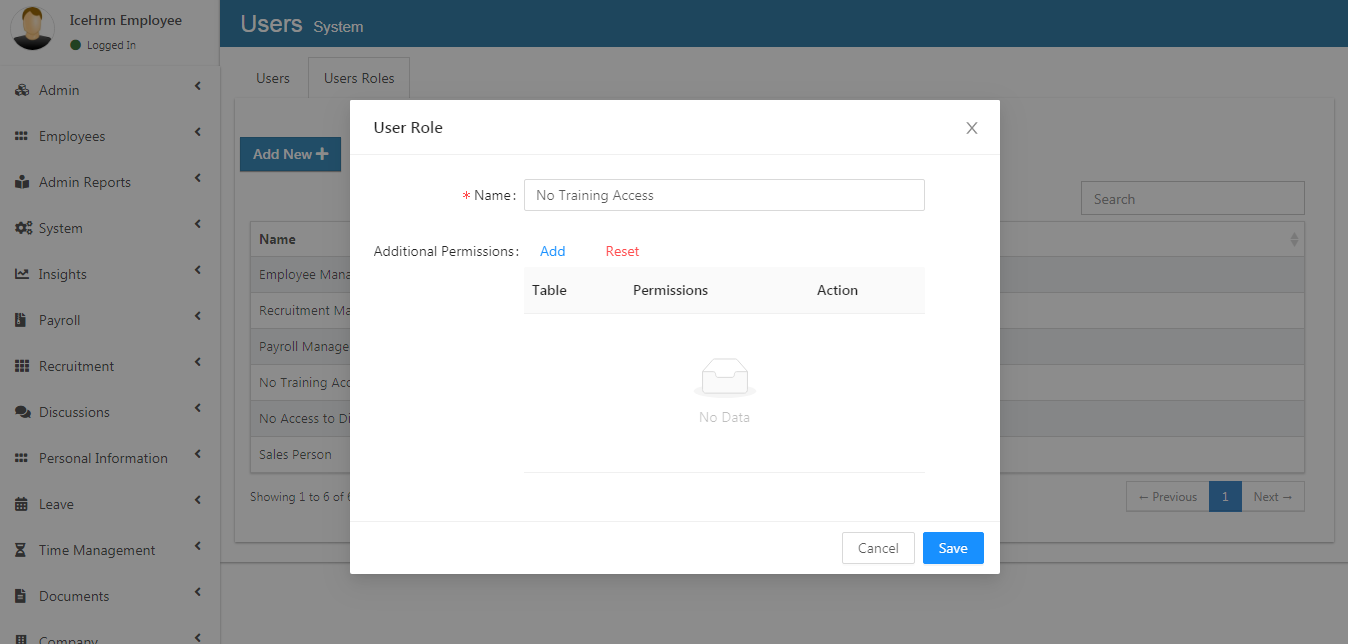
Then click on the User role tab and then click on the Add New option in order to create a New User role
Then you can give a specific name to the User role - For this one, you can use Sales Person or something similar
Then Select the Table and then assign Permission
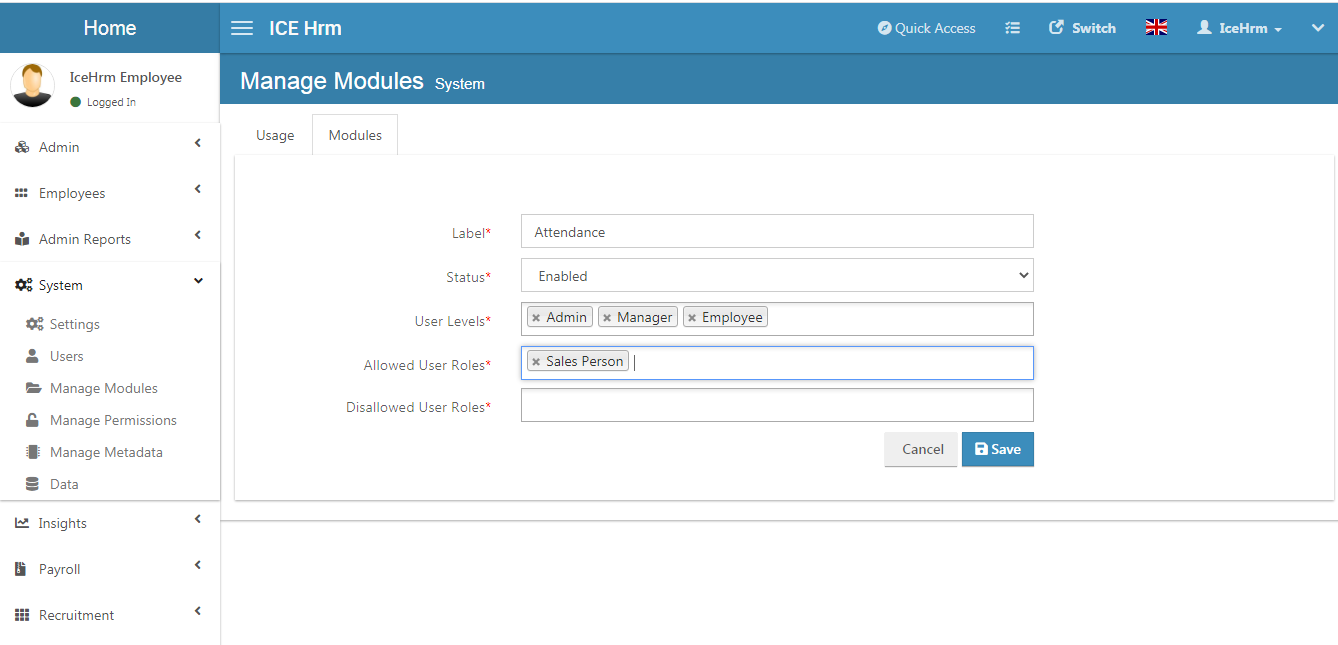
Now go to the Manage modules section under the System in order to assign the particular module to the new user role
Then click on the Modules tab and search for the particular module
Click on the edit button to make changes
Add the created User Role to this module and save it
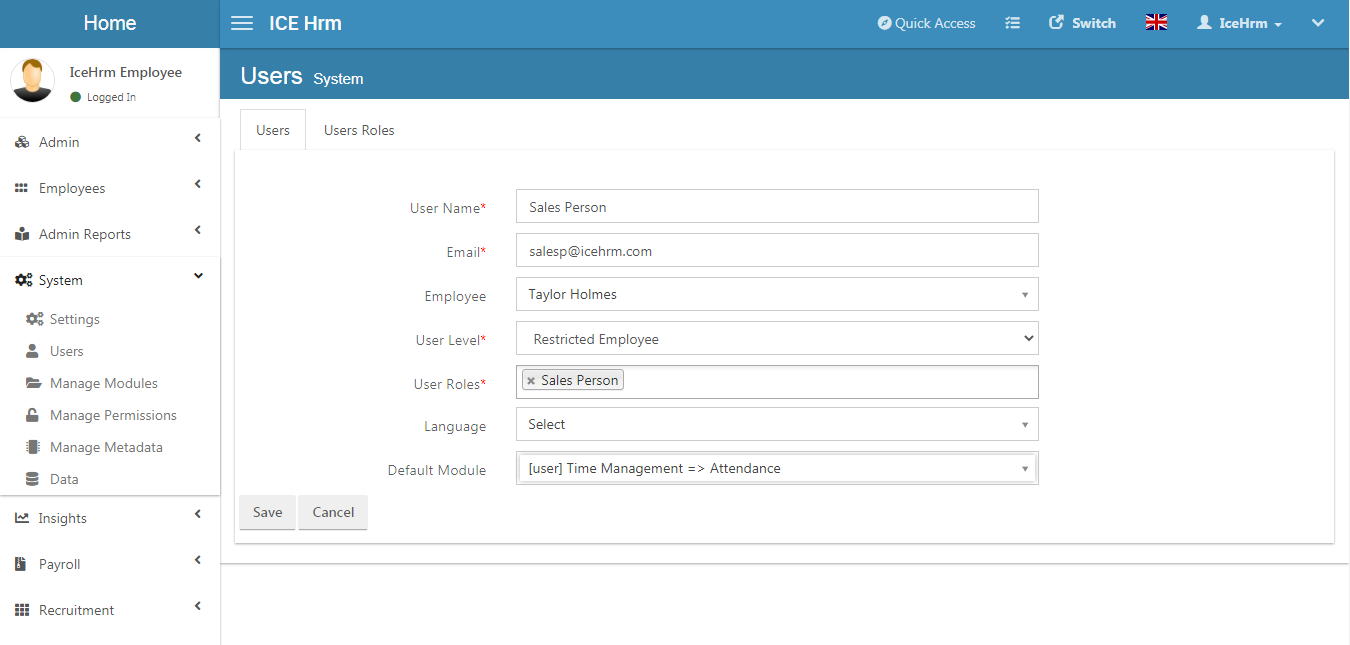
After creating the User role and Assigning the module, go back to the User section and click on the User tab in order to assign this role to the employee
Click on Add New to create a new user
Make sure the User Level of the employee is Restricted Employee user level
Then Select the specific user role which you have already created
Set a default module and then save
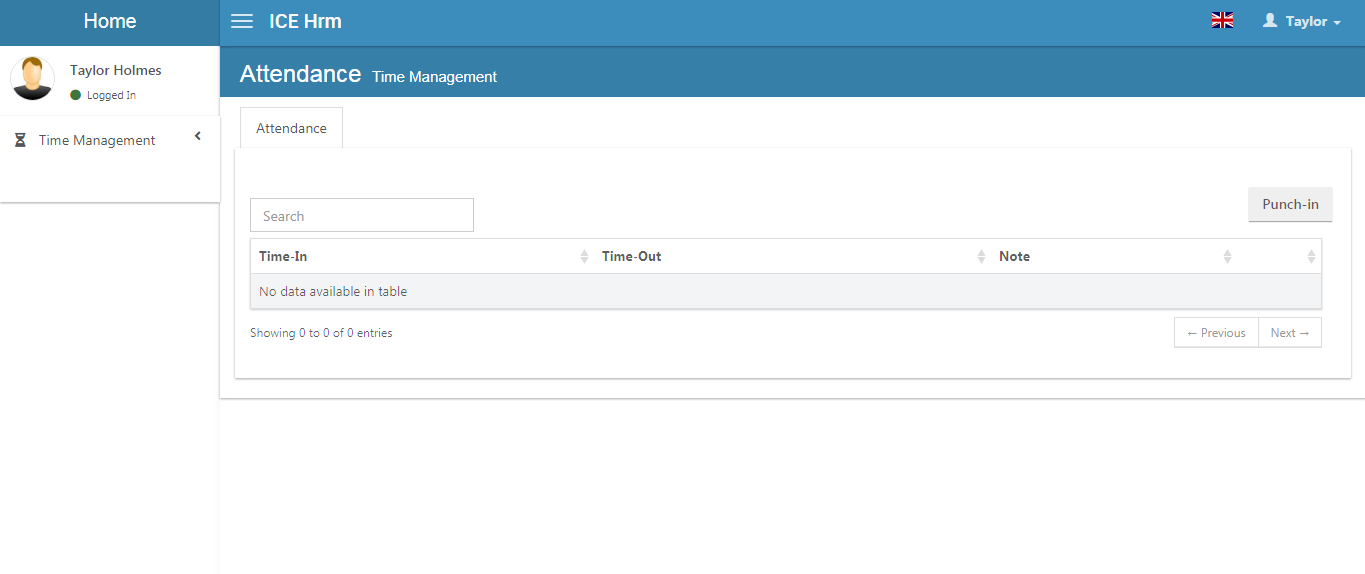
Once you save the changes and logged in to the employee's account it will look like the below. The employee will only have access to mark attendance
How to deny access to a particular module for a user level
Denying access to one module for a particular user is easy as the same way that granting access.
Example: You want to deny access to the training module for one of your employees
To do this,
Login to the admin account
Go to the System section and click on the Users
Then click on the User role tab and then Add New option in order to create a New User role
Then you can give a specific name to the User role and save
Now go to the Manage modules section under the System in order to assign the particular module to the new user role
Then click on the Modules tab and search for the particular module
Click on the edit button to make changes
Select the created User Role to the Disallowed User Roles option and save it
After creating the User role and assigning the module now you can go back to the User section and click on the User tab in order to assign this to the user
Select the employee you want to make changes and click on the edit button or Click on Add New to create a new user
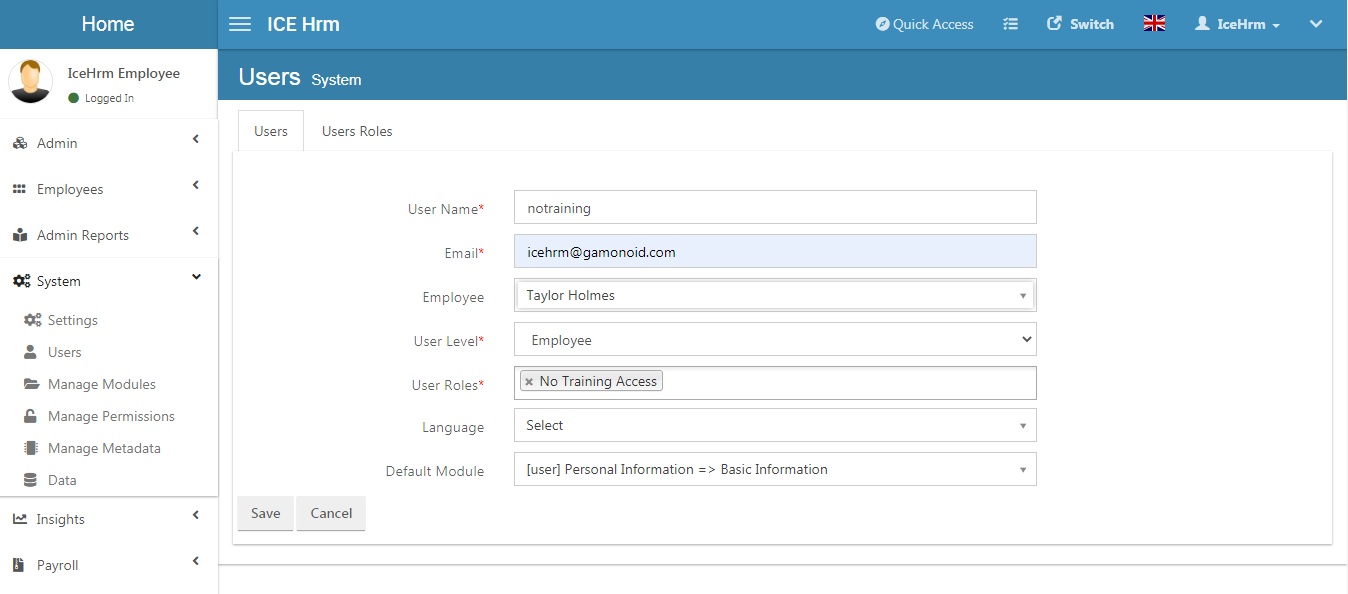
Change the User Level of the employee according to your requirement (for this example, select Employee as the user level)
Then Select the specific user role which you have already created, disallowing training module
Set a default module and then save
Log in as the employee and you will notice that the employee doesn't have the Training module
The IceHrm document management features helps you organize all your files and data in one place, keep track of all your important documents, speed up your...